[ OCR ] 파이썬 Tesseract OCR 활용 (심화1) - Python
OCR에서는 인식율이 매우 중요하며, 당연한 이야기이기도 하지만 이미지의 품질이 가장 중요합니다. 하지만 현실에서 우리가 인식하려는 이미지의 품질은 매우 좋지 않습니다.

다양한 촬영기기 (카메라/스캐너/팩스 등), 다양환 촬영 환경 (조명/화각/배경 등) 등으로 인해 매우 불량한 상태의 이미지이고 이러한 이미지의 인식율을 올린다는 것은 매우 도전적인 일입니다.
이전 글에서 간단히 Tesseract를 사용해봤다면, 입력된 이미지를 이미지 전처리 과정을 통해 Scan한 이미지로 변경하여 OCR을 수행하는 방법에 대해 소개하겠습니다.
먼저, Tesseract가 설치되어 있지 않다면, Tesseract 설치방법을 참고하시여 설치를 진행해 주시기 바랍니다.
Import Packages
from imutils.perspective import four_point_transform import matplotlib.pyplot as plt import pytesseract import imutils import cv2 import re import requests import numpy as np
Jupyter Notebook 또는 Colab에서 이미지를 확인하기위한 Function
def plt_imshow(title='image', img=None, figsize=(8 ,5)): plt.figure(figsize=figsize) if type(img) == list: if type(title) == list: titles = title else: titles = [] for i in range(len(img)): titles.append(title) for i in range(len(img)): if len(img[i].shape) <= 2: rgbImg = cv2.cvtColor(img[i], cv2.COLOR_GRAY2RGB) else: rgbImg = cv2.cvtColor(img[i], cv2.COLOR_BGR2RGB) plt.subplot(1, len(img), i + 1), plt.imshow(rgbImg) plt.title(titles[i]) plt.xticks([]), plt.yticks([]) plt.show() else: if len(img.shape) < 3: rgbImg = cv2.cvtColor(img, cv2.COLOR_GRAY2RGB) else: rgbImg = cv2.cvtColor(img, cv2.COLOR_BGR2RGB) plt.imshow(rgbImg) plt.title(title) plt.xticks([]), plt.yticks([]) plt.show()
Image Load
url = 'https://user-images.githubusercontent.com/69428232/148330274-237d9b23-4a79-4416-8ef1-bb7b2b52edc4.jpg' image_nparray = np.asarray(bytearray(requests.get(url).content), dtype=np.uint8) org_image = cv2.imdecode(image_nparray, cv2.IMREAD_COLOR) plt_imshow("orignal image", org_image)
Find Contours
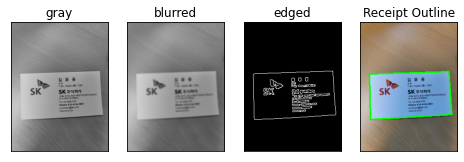
image = org_image.copy() image = imutils.resize(image, width=500) ratio = org_image.shape[1] / float(image.shape[1]) # 이미지를 grayscale로 변환하고 blur를 적용 # 모서리를 찾기위한 이미지 연산 gray = cv2.cvtColor(image, cv2.COLOR_BGR2GRAY) blurred = cv2.GaussianBlur(gray, (5, 5,), 0) edged = cv2.Canny(blurred, 75, 200) plt_imshow(['gray', 'blurred', 'edged'], [gray, blurred, edged])
Contour란 같은 값을 가진 곳을 연결한 선이라고 생각하면 됩니다. 이미지의 외곽선을 검출하기 위해 사용합니다.
cv2.findContours(image, mode, method, contours=None, hierarchy=None, offset=None) -> contours
• image: 입력 이미지. non-zero 픽셀을 객체로 간주함
• mode: 외곽선 검출 모드. cv2.RETR_로 시작하는 상수
• method: 외곽선 근사화 방법. cv2.CHAIN_APPROX_로 시작하는 상수
# contours를 찾아 크기순으로 정렬 cnts = cv2.findContours(edged.copy(), cv2.RETR_EXTERNAL, cv2.CHAIN_APPROX_SIMPLE) cnts = imutils.grab_contours(cnts) cnts = sorted(cnts, key=cv2.contourArea, reverse=True) receiptCnt = None # 정렬된 contours를 반복문으로 수행하며 4개의 꼭지점을 갖는 도형을 검출 for c in cnts: peri = cv2.arcLength(c, True) approx = cv2.approxPolyDP(c, 0.02 * peri, True) # contours가 크기순으로 정렬되어 있기때문에 제일 첫번째 사각형을 영수증 영역으로 판단하고 break if len(approx) == 4: receiptCnt = approx break # 만약 추출한 윤곽이 없을 경우 오류 if receiptCnt is None: raise Exception(("Could not find receipt outline.")) output = image.copy() cv2.drawContours(output, [receiptCnt], -1, (0, 255, 0), 2) plt_imshow("Receipt Outline", output)
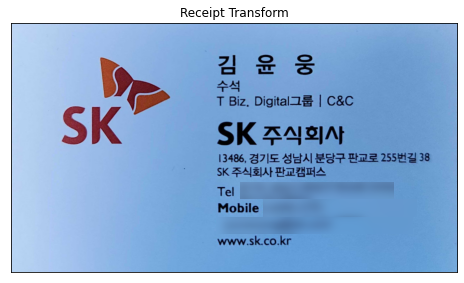
# 원본 이미지에 찾은 윤곽을 기준으로 이미지를 보정 receipt = four_point_transform(org_image, receiptCnt.reshape(4, 2) * ratio) plt_imshow("Receipt Transform", receipt)

Recognition
options = "--psm 4" text = pytesseract.image_to_string(cv2.cvtColor(receipt, cv2.COLOR_BGR2RGB), config=options) # OCR결과 출력 print("[INFO] OCR결과:") print("==================") print(text) print("\n")
[INFO] OCR결과:
==================
WHOLE
FOODS
WHOLE FOODS MARKET - WESTPORT, CT 06880
399 POST RD WEST - (203) 227-6858
365 BACON LS NP 4.99
365 BACON LS NP 4.99
365 BACON LS NP 4,99
365 BACON LS NP 4.99
BROTH CHIC NP 4.15
FLOUR ALMOND NP 11.99
CHKN BRST BNLSS SK NP 18.80
HEAVY CREAM NP 3.39
BALSMC REDUCT NP 6.49
BEEF GRND 85/15 NP 5.04
JUICE COF CASHEW C NP 8.99
DOCS PINT ORGANIC NP 14.49
HNY ALMOND BUTTER NP 9.99
eee TAX .00 BAL 101.33
다른 이미지를 테스트 해보기 위해 위의 과정을 Function 만들었습니다.
def run_tesseract_ocr(image, width, ksize=(5,5), min_threshold=75, max_threshold=200, lang='eng'): image_list_title = [] image_list = [] image = imutils.resize(image, width=width) ratio = org_image.shape[1] / float(image.shape[1]) # 이미지를 grayscale로 변환하고 blur를 적용 # 모서리를 찾기위한 이미지 연산 gray = cv2.cvtColor(image, cv2.COLOR_BGR2GRAY) blurred = cv2.GaussianBlur(gray, ksize, 0) edged = cv2.Canny(blurred, min_threshold, max_threshold) image_list_title = ['gray', 'blurred', 'edged'] image_list = [gray, blurred, edged] # contours를 찾아 크기순으로 정렬 cnts = cv2.findContours(edged.copy(), cv2.RETR_EXTERNAL, cv2.CHAIN_APPROX_SIMPLE) cnts = imutils.grab_contours(cnts) cnts = sorted(cnts, key=cv2.contourArea, reverse=True) receiptCnt = None # 정렬된 contours를 반복문으로 수행하며 4개의 꼭지점을 갖는 도형을 검출 for c in cnts: peri = cv2.arcLength(c, True) approx = cv2.approxPolyDP(c, 0.02 * peri, True) # contours가 크기순으로 정렬되어 있기때문에 제일 첫번째 사각형을 영수증 영역으로 판단하고 break if len(approx) == 4: receiptCnt = approx break # 만약 추출한 윤곽이 없을 경우 오류 if receiptCnt is None: raise Exception(("Could not find receipt outline.")) output = image.copy() cv2.drawContours(output, [receiptCnt], -1, (0, 255, 0), 2) image_list_title.append("Receipt Outline") image_list.append(output) # 원본 이미지에 찾은 윤곽을 기준으로 이미지를 보정 receipt = four_point_transform(org_image, receiptCnt.reshape(4, 2) * ratio) plt_imshow(image_list_title, image_list) plt_imshow("Receipt Transform", receipt) options = "--psm 4" text = pytesseract.image_to_string(cv2.cvtColor(receipt, cv2.COLOR_BGR2RGB), lang=lang, config=options) # OCR결과 출력 print("[INFO] OCR결과:") print("==================") print(text)
새로운 이미지로 테스트를 해봅니다.
url = 'https://user-images.githubusercontent.com/69428232/155486780-55525c3c-8f5f-4313-8590-dd69d4ce4111.jpg' image_nparray = np.asarray(bytearray(requests.get(url).content), dtype=np.uint8) org_image = cv2.imdecode(image_nparray, cv2.IMREAD_COLOR) run_tesseract_ocr(org_image, width=200, ksize=(5, 5), min_threshold=20, max_threshold=100, lang='kor+eng')
[INFO] OCR결과:
==================
S
~
K
> &
김 윤 웅
수석
T Biz. Digital l= | C&C
야《 주식회사
13486, 경기도 성남시 분당구 판교로 255번길 38
5 주식회사 판교캠퍼스
Tel
Mobile
www.sk.co.kr
나름대로 인식이 잘되었지만, 문제는 이미지영역이 포함되어 일부 특수문자로 출력되었네요. 그림, 표, 바코드 등을 포함한 복잡한 구조의 이미지인 경우에서는 OCR 결과가 좋지 않습니다. 원하는 영역만을 추출하여 OCR이 수행되도록 고민해보고 추가적으로 이미지연산을 통해 Scan 이미지로 변경하는 방법보다 더 나아진 방법을 찾아 적용해 보도록 하겠습니다.
(옵션값을 바꿔가며 보정하는 방법은 다양한 이미지 형태가 존재하는 환경에서는 써먹지를 못하겠네요..)
Source Code
다음글
'Tech & Development > OCR' 카테고리의 다른 글
| [ OCR ] 문자 추출 및 인식 (EAST text Detector Model) - Python (5) | 2022.01.13 |
|---|---|
| [ OCR ] 파이썬 Tesseract OCR 활용 (심화2) - Python (7) | 2022.01.11 |
| [ OCR ] 파이썬 Tesseract OCR 활용 (기본) - Python (4) | 2021.12.23 |
| [ OCR ] Tesseract, PyTesseract 설치방법 (OCR 개발환경) - Python (1) | 2021.12.13 |
| [ Python ] 간단한 MNIST 모델 (OCR) 만들기 (0) | 2021.11.29 |
댓글을 사용할 수 없습니다.