dlib, Python을 이용하여 강아지 얼굴 인식하는 방법
사람 얼굴을 인식하는 방법에서 조금 더 나아가 강아지의 얼굴을 인식하는 방법에 대해 알아보겠습니다. 강아지 얼굴을 인식하기 위한 모델은 tureckova 라는 분이 개발한 모델을 사용했습니다. (tureckova는 강아지가 카메라를 바라보면 얼굴을 인식하여 자동으로 저장하기 위한 프로그램을 개발하기 위한 목적이였다고 설명하고 있습니다.)
모델 파일은 링크에서 다운로드 가능합니다. (dogHeadDetector.dat, landmarkDetector.dat 파일을 다운로드 받습니다.)
아직까지 사람들은 자신의 얼굴을 인식되는 상황에 대해 거부감이 있습니다. 실제 얼굴 사진을 수집하는 것이 아니라 얼굴의 측정값이라 하더라도 말이죠. 그래서 오히려 강아지 얼굴을 인식하고 구별 할 수 있다면 유기견 문제를 해결하거나 동물 보호자에게 유실 시 발생 할 수 있는 다양한 분쟁의 소지를 해소 할 수 있을 것 같다는 아이디어 차원에서 작성하였습니다.

우선, dlib가 이미 설치가 되어 있어야 합니다. 만약 설치되어 있지 않다면 dlib 설치가이드를 참고하시여 설치를 진행하시기 바랍니다. 그리고 얼굴 인식 기본적인 설명은 이전 글을 참고하시기 바랍니다.
1. Import Packages
import cv2 import dlib import imutils from imutils import face_utils import numpy as np import matplotlib.pyplot as plt import face_recognition
2. Function
Colab 또는 Jupyter Notebook에서 이미지를 확인하기 위한 Function입니다.
def plt_imshow(title='image', img=None, figsize=(8 ,5)): plt.figure(figsize=figsize) if type(img) == list: if type(title) == list: titles = title else: titles = [] for i in range(len(img)): titles.append(title) for i in range(len(img)): if len(img[i].shape) <= 2: rgbImg = cv2.cvtColor(img[i], cv2.COLOR_GRAY2RGB) else: rgbImg = cv2.cvtColor(img[i], cv2.COLOR_BGR2RGB) plt.subplot(1, len(img), i + 1), plt.imshow(rgbImg) plt.title(titles[i]) plt.xticks([]), plt.yticks([]) plt.show() else: if len(img.shape) < 3: rgbImg = cv2.cvtColor(img, cv2.COLOR_GRAY2RGB) else: rgbImg = cv2.cvtColor(img, cv2.COLOR_BGR2RGB) plt.imshow(rgbImg) plt.title(title) plt.xticks([]), plt.yticks([]) plt.show()
face_recognition에서 제공되는 일부 함수를 강아지 인식하는 함수로 일부 수정하여 선언합니다.
def _trim_css_to_bounds(css, image_shape): return max(css[0], 0), min(css[1], image_shape[1]), min(css[2], image_shape[0]), max(css[3], 0) def _rect_to_css(rect): return rect.top(), rect.right(), rect.bottom(), rect.left() def _raw_face_locations(img, number_of_times_to_upsample=1): return detector(img, number_of_times_to_upsample) def face_locations(img, number_of_times_to_upsample=1): return [_trim_css_to_bounds(_rect_to_css(face.rect), img.shape) for face in _raw_face_locations(img, number_of_times_to_upsample)]
강아지 얼굴을 찾는 함수입니다.
def find_dog_face(input_image, size=None, debug=False): image = input_image.copy() if size: image = imutils.resize(image, width=size) gray_image = cv2.cvtColor(image, cv2.COLOR_BGR2GRAY) dets = detector(gray_image, 1) print('Found {} faces.'.format(len(dets))) for (i, det) in enumerate(dets): # 얼굴 영역의 얼굴 랜드마크를 결정한 다음 # 얼굴 랜드마크(x, y) 좌표를 NumPy Array로 변환합니다. shape = predictor(image, det.rect) shape = face_utils.shape_to_np(shape) # dlib의 사각형을 OpenCV bounding box로 변환(x, y, w, h) (x, y, w, h) = face_utils.rect_to_bb(det.rect) cv2.rectangle(image, (x, y), (x + w, y + h), (0, 255, 0), 2) cv2.putText(image, "Face #{}".format(i + 1), (x - 10, y - 10), cv2.FONT_HERSHEY_SIMPLEX, 0.5, (0, 255, 0), 2) if debug: # 얼굴 랜드마크에 포인트를 그립니다. for (i, (x, y)) in enumerate(shape): cv2.circle(image, (x, y), int(image.shape[1]/250), (0, 0, 255), -1) # cv2.putText(image, str(i + 1), (x - 10, y - 10), cv2.FONT_HERSHEY_SIMPLEX, 0.2, (255, 255, 255), 1) plt_imshow(["Original", "Find Faces"], [input_image, image], figsize=(16,10))
3. Load Model
face_landmark_detector_path = 'lib/landmark/dogHeadDetector.dat' face_landmark_predictor_path = 'lib/landmark/landmarkDetector.dat' detector = dlib.cnn_face_detection_model_v1(face_landmark_detector_path) predictor = dlib.shape_predictor(face_landmark_predictor_path)
4. Load Image
image_path = 'asset/images/dog.jpg' image = cv2.imread(image_path)
5. Face Recognition
find_dog_face(image, debug=True)매우 인식을 잘하는 것 같습니다.
조금 더 나아가서 강아지를 구별 할 수 있는지 알아보겠습니다.
6. For Labeling
강아지를 구별하기 위한 함수를 선언합니다. 이 함수들은 사람의 얼굴을 구별하기 위한 함수를 재활용하였습니다.
def draw_label(input_image, coordinates, label): image = input_image.copy() (top, right, bottom, left) = coordinates cv2.rectangle(image, (left, top), (right, bottom), (0, 255, 0), 5) cv2.putText(image, label, (left - 10, top - 10), cv2.FONT_HERSHEY_SIMPLEX, 2, (0, 255, 0), 3) return image def add_known_face(face_image_path, name): face_image = cv2.imread(face_image_path) dets_locations = face_locations(face_image, 1) face_encoding = face_recognition.face_encodings(face_image, dets_locations)[0] detected_face_image = draw_label(face_image, dets_locations[0], name) known_face_encodings.append(face_encoding) known_face_names.append(name) plt_imshow(["Input Image", "Detected Face"], [face_image, detected_face_image]) def name_labeling(input_image, size=None): image = input_image.copy() if size: image = imutils.resize(image, width=size) dets_locations = face_locations(image) face_encodings = face_recognition.face_encodings(image, dets_locations) face_names = [] for face_encoding in face_encodings: matches = face_recognition.compare_faces(known_face_encodings, face_encoding, tolerance=0.4) name = "Unknown" face_distances = face_recognition.face_distance(known_face_encodings, face_encoding) best_match_index = np.argmin(face_distances) if matches[best_match_index]: name = known_face_names[best_match_index] face_names.append(name) for (top, right, bottom, left), name in zip(dets_locations, face_names): if name != "Unknown": color = (0, 255, 0) else: color = (0, 0, 255) cv2.rectangle(image, (left, top), (right, bottom), color, 1) cv2.rectangle(image, (left, bottom - 10), (right, bottom), color, cv2.FILLED) font = cv2.FONT_HERSHEY_DUPLEX cv2.putText(image, name, (left + 3, bottom - 3), font, 0.2, (0, 0, 0), 1) plt_imshow("Output", image, figsize=(24, 15))
known_face_encodings = [] known_face_names = []
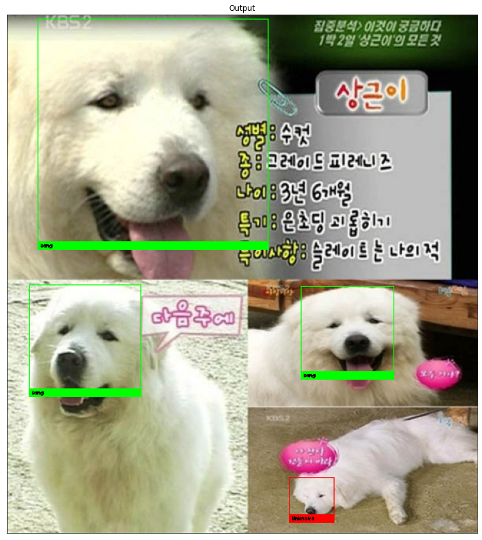
구별하기 위한 강아지를 등록합니다. 저는 예전 예능 프로그램에서 유명했던 '상근이' 라는 강아지를 등록하였습니다.
add_known_face("asset/images/dog1.jpg", "sang")
이제 찾을 사진을 Load 하고 잘 찾는 지 수행해보겠습니다.
test_image_path = 'asset/images/dog3.jpg' test_image = cv2.imread(test_image_path) if test_image is None: print('The image does not exist in the path.') else: print('image loading complete.')
name_labeling(test_image)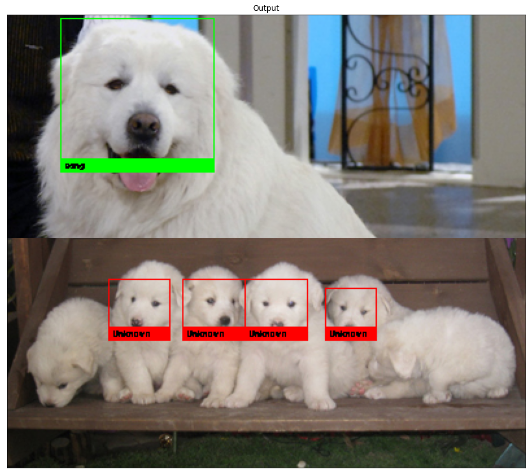
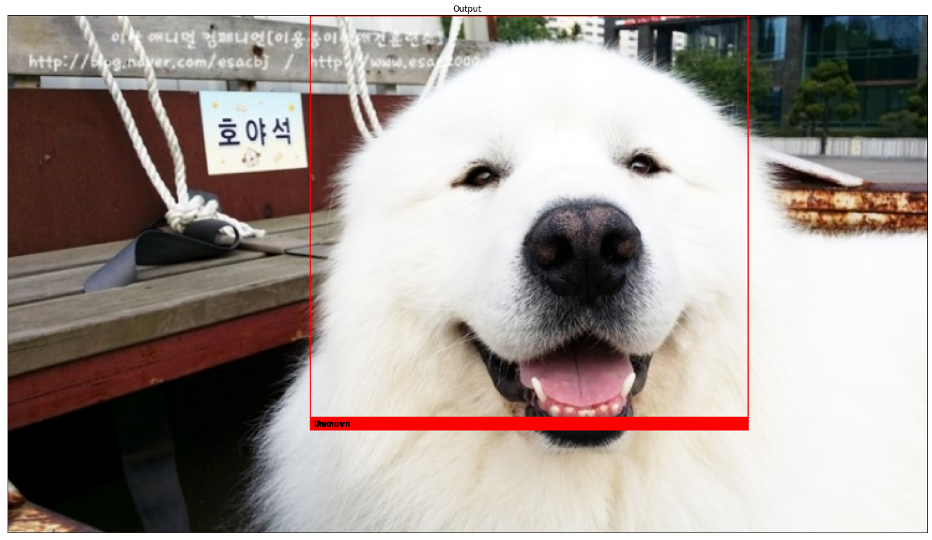
위에는 상근이 사진이고 밑에는 상근이의 자식들인데 구별을 잘 한 것 같습니다. 밑에는 '호야'라는 상근이의 새끼인데 역시 잘 구별하는 것 같구요.
하지만 화소나 각도에 따라 구별을 못하는 경우도 있습니다. 현재는 얼굴을 비교하기 위한 face encoding을 사람의 모델로 수행했습니다. 정확한 비교를 위해서는 강아지의 모델로 encoding하여 비교 할 수 있도록 개발이 필요 할 것 같습니다.

하지만 얼굴 인식은..
MIT에서는 피부색이 어두울수록 남성과 여성의 차이를 구별하기 더 어렵다고 발표하였고 어떠한 경우는 무고한 사람들이 범죄자로 인식되는 사례도 종종 보도가 되기도 합니다.
2020년 5월 25일, 흑인 조지 플로이드 사망 사건 진원지인 미네소타주 미니애폴리스 경찰이 인공지능(AI) 안면 인식 시스템인 '클리어뷰(Clearview)'를 활용하고 있다고 외신들에 의해 보도되면서 법 집행기관에서 AI 얼굴인식 기술을 사용한다는 논란이 되었습니다.
이에 아마존이 1년간 경찰에 자사의 얼굴인식 소프트웨어 '레커그니션'(Rekognition)의 판매를 중단한다고 밝혔고 IBM, 마이크로소프트, 구글 등 글로벌 AI 기업들 역시 대부분 2020년 6월 이후 인공지능(AI) 얼굴인식 사업에서 손을 떼겠다고 선언했습니다.여기에, 페이스북이 2021년 11월 2일(현지시간) 안면인식기술에 대해 포기를 선언했습니다. 지속되는 프라이버시와 윤리 문제에 굴복하고 적어도 소셜네트워크 플랫폼에서는 더이상 사용하지 않기로 했습니다. 반면 AI 얼굴 인식에서의 인권 사각지대인 중국은 2030년 AI 분야의 세계적인 리더가 되는 목표를 세우고 가속하고 있습니다.
저 역시 인공지능 및 데이터 기술을 활용하다보면 데이터의 편향으로 문제가 될 수도 있으니 신중한 접근이 필요하다고 느껴 질때가 있습니다.
최근 동물 얼굴 인식에 대해 관심이 많아지고 있는 것 같습니다. 생각보다 사람 얼굴 인식에 비해 동물 얼굴 인식 연구는 많지 않았던 것 같습니다. 2020년 11월 22일 CNN 보도에 따르면 캐나다의 곰 전문 생물학자인 멜라니 클래펌이 실리콘밸리 출신의 기술자들과 함께 곰의 얼굴을 인식하는 소프트웨어를 개발했다고 소개하고 있네요.
야생동물을 모니터링하기 위해 동물의 피부에 칩을 이식하는데, 이는 소프트웨어를 활용하는 것보다 비용이 비싸고 수명은 짧다는 단점이 있다고 합니다. 동물을 추척하는데 활용 할 수 있고 이를 데이타화하여 특징을 파악하고 연구하는데에도 활용 할 수 있다고 합니다. 현재 동물에게 얼굴인식 소프트웨어를 적용시키기 위한 연구는 세계 곳곳에서 시도되고 있으니 관심을 두고 연구해 볼만한 일인 것 같습니다.
'Tech & Development > AI' 카테고리의 다른 글
| [ Python ] 미디어파이프(Mediapipe) 이용한 얼굴인식 (2) | 2022.02.04 |
|---|---|
| Python, OpenCV Haar Cascades를 이용한 얼굴 인식방법 (0) | 2022.01.28 |
| dlib, Python을 이용하여 얼굴 인식하는 방법 (0) | 2022.01.20 |
| dlib, Python을 이용하여 얼굴 검출하기 (0) | 2022.01.20 |
| 맥북 dlib 간단하게 설치하기 (Mac OS) (0) | 2022.01.17 |
댓글을 사용할 수 없습니다.