[ Python ] ASCII Character Art 만들기 (100줄)
2018년 삼성 오픈소스 컨퍼런스에 참석 했을 당시 Keynote에서 "호안 산도발(Joan Sandoval)"이라는 크리에이티브 코더의 라이브코딩을 보고 상당히 신선한 자극을 받았습니다. 호안 산도발은 기술, 디자인, 예술의 경계를 연구하는데 관심을 가지고 있으며 다양하고 독특한 프로젝트들을 개발하고 있습니다.
이 날 선보인 건 Hand Coded 라는 공연으로 직접 Loop, Sleep 같은 코드를 입력하면서 리듬을 변화시키며 연주를 하는 거죠. 저에게는 상당히 신선했습니다. 항상 코딩을 상업적/생산성 관점에서 명확한 산출물을 만드는 것을 목표로 했었는데, 이렇게 "개발을 이용해 다양하고 멋진 퍼포먼스를 선보일 수도 있겠구나" 하고 생각했죠.

여기서 일단, DJ가 디제잉 하듯 보이는 영역을 Python으로 개발해보려고 합니다. (잘 안보이긴 하네요.)
100줄 정도의 Code로 이미지와 영상을 ASCII Character Art로 표현하도록 하겠습니다. 전체 Source는 Github에 있습니다.
import cv2 import numpy as np from PIL import Image from PIL import ImageFont from PIL import ImageDraw from math import ceil import time from imutils.video import VideoStream
다양한 옵션을 적용하기 위한 변수입니다.
PIL_GRAYSCALE = 'L' PIL_WIDTH_INDEX = 0 PIL_HEIGHT_INDEX = 1 CHARS = ['.', ',', '-', '~', ':', ';', '+', '*', '?', '%', '$', '#', '@'] resize_width = 200
ASCII Character로 변환하면 Text이기때문에 Text를 이미지로 변경하는 Function을 만듭니다.
def text_to_image(text_img): lines = text_img font = None font = ImageFont.load_default() # 글꼴과 선의 조합으로 충분한 크기의 배경 이미지를 생성 font_points_to_pixels = lambda pt: round(pt * 96.0 / 72) margin_pixels = 20 # 배경 이미지의 높이 tallest_line = max(lines, key=lambda line: font.getsize(line)[PIL_HEIGHT_INDEX]) max_line_height = font_points_to_pixels(font.getsize(tallest_line)[PIL_HEIGHT_INDEX]) realistic_line_height = max_line_height * 0.8 image_height = int(ceil(realistic_line_height * len(lines) + 2 * margin_pixels)) # 배경 이미지의 너비 widest_line = max(lines, key=lambda s: font.getsize(s)[PIL_WIDTH_INDEX]) max_line_width = font_points_to_pixels(font.getsize(widest_line)[PIL_WIDTH_INDEX]) image_width = int(ceil(max_line_width + (2 * margin_pixels))) # 배경이미지 생성 background_color = 0 # white image = Image.new(PIL_GRAYSCALE, (image_width, image_height), color=background_color) draw = ImageDraw.Draw(image) # 텍스트의 라인 별로 그리기 font_color = 255 # black horizontal_position = margin_pixels for i, line in enumerate(lines): vertical_position = int(round(margin_pixels + (i * realistic_line_height))) draw.text((horizontal_position, vertical_position), line, fill=font_color, font=font) return image
이미지를 ASCII 이미지로 변환하는 Function입니다. Grasalce로 변환하고 For문을 통해 각 Row를 읽고 다시 한번 For문으로 Pixel일 읽어서 ASCII Character로 변환합니다.
def ascii_art(img, debug=False): result_img = None rgb_img = cv2.cvtColor(img, cv2.COLOR_BGR2RGB) gray_img = cv2.cvtColor(img, cv2.COLOR_BGR2GRAY) h, w = gray_img.shape new_height = int(h / w * resize_width) gray_img = cv2.resize(gray_img, (resize_width * 2, new_height)) text_img = tuple() for row in gray_img: text_line = "" for pixel in row: index = int(pixel / 256 * len(CHARS)) text_line = text_line + CHARS[index] # print(text_line) text_img += (text_line,) pil_image = Image.fromarray(rgb_img, "RGB") ascii_image = text_to_image(text_img) pil_resize_image = pil_image.resize((int(pil_image.size[0]/6), int(pil_image.size[1]/6))) ascii_resize_image = ascii_image.resize((int(ascii_image.size[0]/3), int(ascii_image.size[1]/3))) new_image = Image.new("RGB", (900, 900), (255, 255, 255)) new_image.paste(pil_resize_image, (10, 10)) new_image.paste(ascii_resize_image, (pil_resize_image.width + 20, 10)) if debug: result_img = new_image else: result_img = ascii_image return result_img
이미지를 ASCII Art 이미지로 변경해보겠습니다. 왼쪽이 원복 이미지이고 오른쪽이 ASCII Character로 변경된 이미지입니다.
img = cv2.imread('test_image.jpg') ascii_art(img, debug=True)
이미지 처리를 만들었다면, 영상 처리는 간단합니다. (video 변수에 파일 경로를 넣으면 동영상 파일이 변환되고 값이 없다면 PC의 Camera로 입력된 영상이 변환됩니다.)
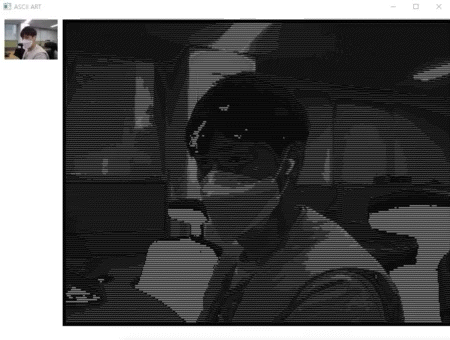
# video = "kids.mp4" video = "" if video: vs = cv2.VideoCapture(video) else: vs = VideoStream(src=0).start() time.sleep(1.0) while True: frame = vs.read() frame = frame[1] if video else frame if frame is None: break ascii_img = ascii_art(frame, debug=True) ascii_cv_img = np.asarray(ascii_img) ascii_cv_bgr_img = cv2.cvtColor(ascii_cv_img, cv2.COLOR_RGB2BGR) cv2.imshow("ASCII ART", ascii_cv_bgr_img) key = cv2.waitKey(1) & 0xFF if key == ord("q"): cv2.destroyAllWindows() break if video: vs.release() else: vs.stop()
'Tech & Development > Image Processing' 카테고리의 다른 글
| [ OpenCV ] Basic 2 - 기본 그리기 (선, 점, 사각형, 원) (0) | 2022.01.10 |
|---|---|
| [ OpenCV ] Basic 1 - 픽셀(Pixel)값 가져오고 설정하기 (0) | 2022.01.10 |
| [ Python ] OpenCV (정리) (0) | 2021.12.10 |
| [ Python ] Pillow (정리) (0) | 2021.12.10 |
| [ Python ] scikit-image (정리) (0) | 2021.12.10 |
댓글을 사용할 수 없습니다.