ChatGPT Retrieval Plugin 개발 (3) : 클라우드 배포
앞서 'ChatGPT Retrieval Plugin 개발 (1) : 아키텍처와 사전 준비'에서는 Retrieval Plugin의 기본 구조와 필요한 준비 과정에 대해 소개하고 'ChatGPT Retrieval Plugin 개발 (2) : 배포 및 실용 가이드'에서는 실제로 Plugin을 어떻게 활용할 수 있는지에 대한 방법을 알아보았습니다.
이번 3번째 파트에서는 ChatGPT Retrieval Plugin을 DigitalOcean 클라우드 플랫폼에 배포하는 방법을 중점적으로 다루게 됩니다. DigitalOcean 외에도 AWS, Google Cloud Platform, Azure 등 다양한 클라우드 플랫폼이 있지만, 이 글에서는 DigitalOcean을 사용하는 예제로 진행하게 됩니다. DigitalOcean은 최초 가입자에게 2개월 동안 $200의 무료 credit을 제공하므로 이번 가이드에서는 이 플랫폼을 활용하였습니다.
이 가이드를 통해, ChatGPT의 확장 기능을 클라우드 환경에서 쉽게 배포하고 ChatGPT 내에 설치하여 활용하는 방법을 배울 수 있습니다.
#1. 사전 준비
ChatGPT Retrieval Plugin을 DigitalOcean에 배포하기 전에 몇 가지 사전 준비 사항이 필요합니다.
1) 사용할 환경변수 준비
- DATASTORE
- OPENAI_API_KEY
- PINECONE_API_KEY
- PINECONE_ENVIRONMENT
- PINECONE_INDEX
- BEARER_TOKEN
2) 가상환경 생성
Python 3.10 버전 이상의 환경이 필요합니다.
3) ChatGPT Retrieval Plugin Fork
만약 위의 사항들이 준비되어 있지 않다면, ChatGPT Retrieval Plugin 개발 (1) : 아키텍처와 사전 준비를 참고하시기 바랍니다.
ChatGPT Retrieval Plugin 개발 (1) : 아키텍처와 사전 준비
인공지능과 머신러닝의 빠른 발전에 따라, 개인이나 기업이 보유한 대량의 데이터를 효율적으로 활용하는 것이 중요해지고 있습니다. ChatGPT Retrieval Plugin은 개인이나 기업, 조직의 프라이빗 데
yunwoong.tistory.com
#2. DigitalOcean 가입하기
1) 먼저 DigitalOcean 공식 사이트에 접속합니다.
DigitalOcean | Cloud Infrastructure for Developers
An ocean of simple, scalable cloud solutions.
www.digitalocean.com
2) DigitalOcean 가입

홈페이지 상단 오른쪽에 위치한 'Sign Up' 버튼 클릭하여 가입하거나 중간에 Google 또는 GitHub 계정을 이용해 간편하게 가입할 수 있습니다.
3) 결제 정보 입력

DigitalOcean은 초기에 결제 정보를 요구합니다. 무료 크레딧을 사용하기 위한 절차이며, 실제로 청구되는 금액은 없습니다. (작은 금액으로 결재가 될 수 있으나, 곧 환불처리 됩니다.)
4) 무료 크레딧 활용

최초 가입자는 2개월 동안 $200의 무료 크레딧을 받게 됩니다. 이 크레딧은 DigitalOcean에서 제공하는 다양한 서비스를 체험하는 데 사용할 수 있습니다.
이제 DigitalOcean 계정이 생성되었으며, 다양한 Droplet 및 서비스를 생성하고 관리할 수 있게 되었습니다.
#3. DigitalOcean App 추가하기
1) Create App

우측 상당 [ Create ]를 선택한 뒤 "Apps"를 클릭합니다.
2) 소스 선택
GitHub, GitLab 또는 Bitbucket 중 원하는 저장소를 선택하고 연동을 합니다.

연동 후 원하는 리포지토리와 브랜치를 선택한 후 [ Next ] 선택 합니다. Auto Deploy를 체크하면 코드 저장소에 변경 사항이 발생할 때마다 자동으로 애플리케이션을 빌드하고 배포하는 프로세스를 의미합니다. 이 기능은 개발자가 수동으로 배포 작업을 수행할 필요 없이, 코드의 변경 사항을 실시간으로 반영하여 애플리케이션의 최신 버전을 유지할 수 있게 해줍니다.
3) 설정 및 배포 옵션 설정
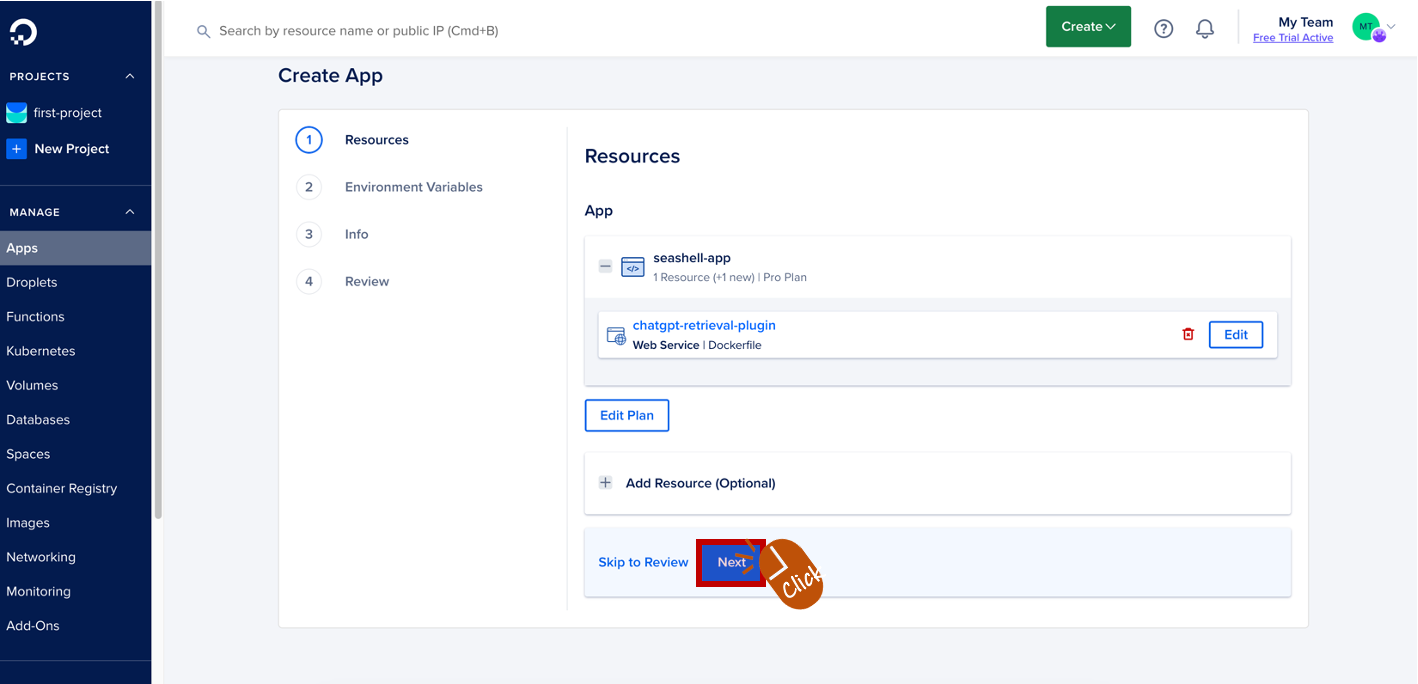
App의 이름, 리전, 환경 변수 등 필요한 설정을 입력하거나 수정합니다. 필요에 따라 데이터베이스, 캐시 등의 추가 서비스를 설정할 수 있습니다.

환경변수를 설정하기 위해 [ Edit ] 을 클릭합니다.
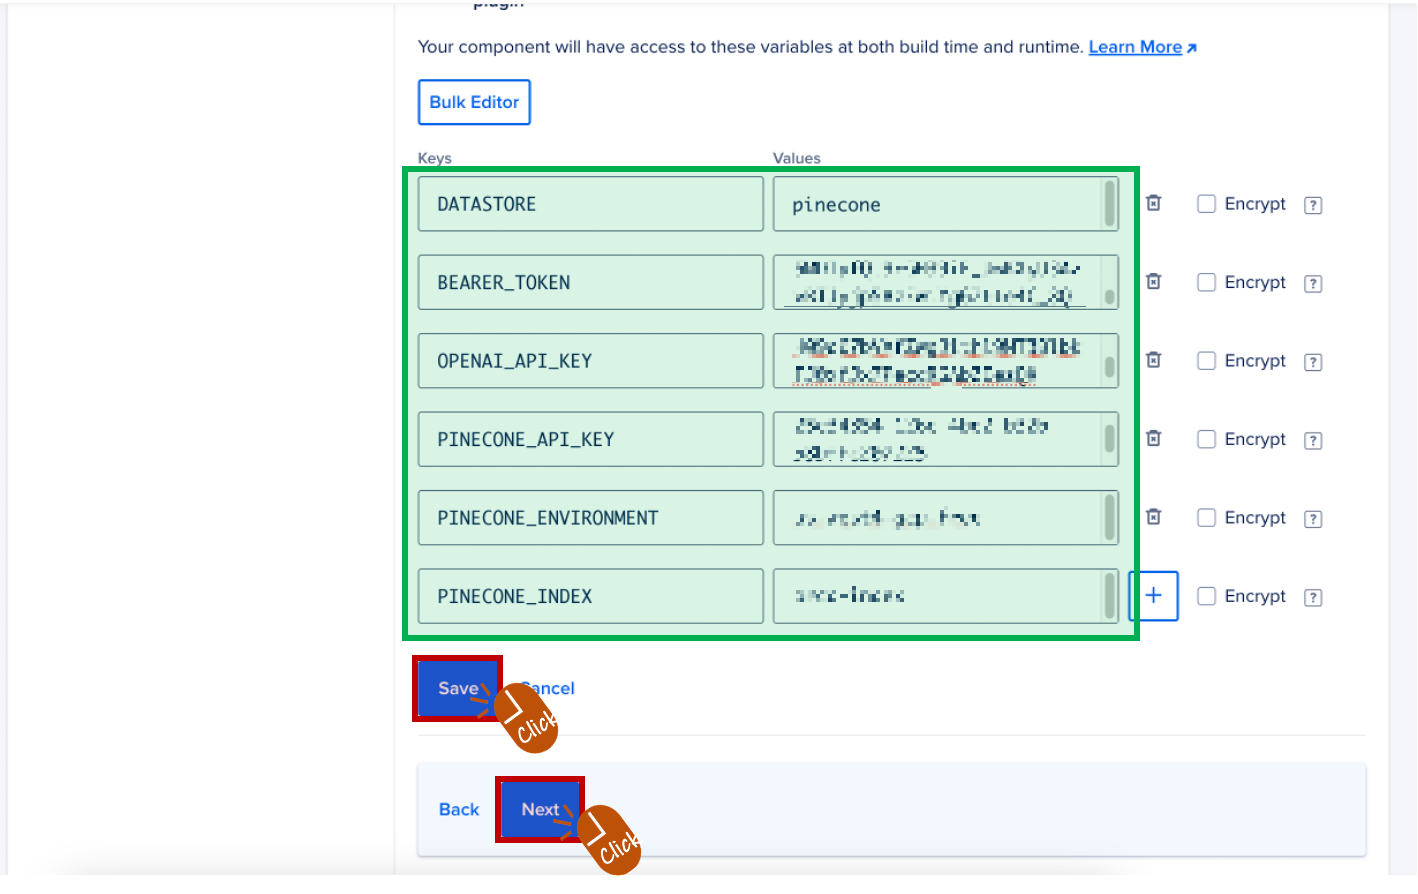
앞서 언급한 값을 해당 환경변수들을 입력합니다.
4) App 배포
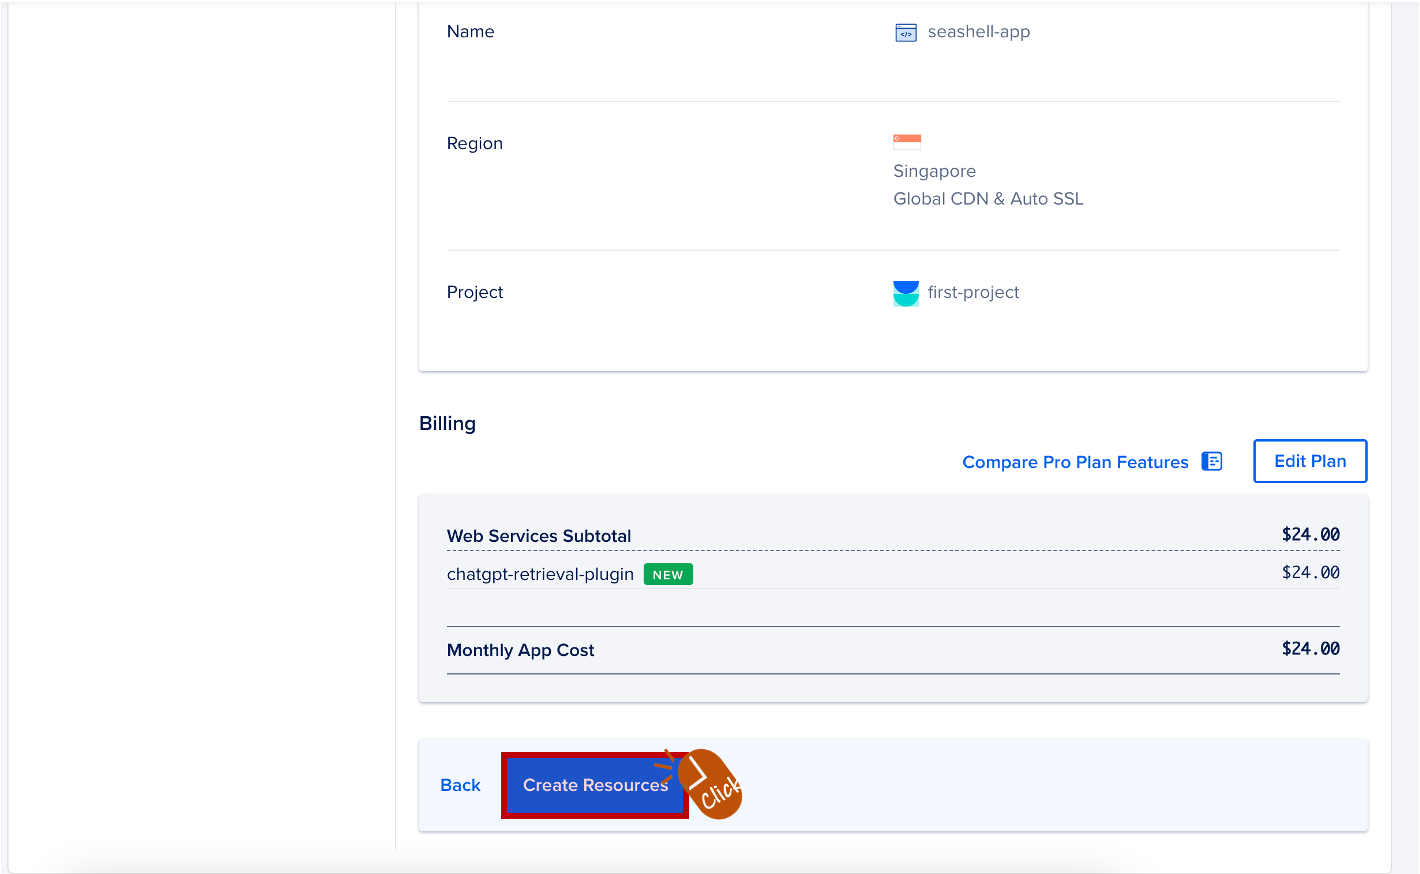
[ Create Resources ] 를 클릭하여 App을 배포합니다. 배포 과정은 몇 분 정도 소요될 수 있습니다.

배포 과정은 몇 분 정도 소요될 수 있습니다.
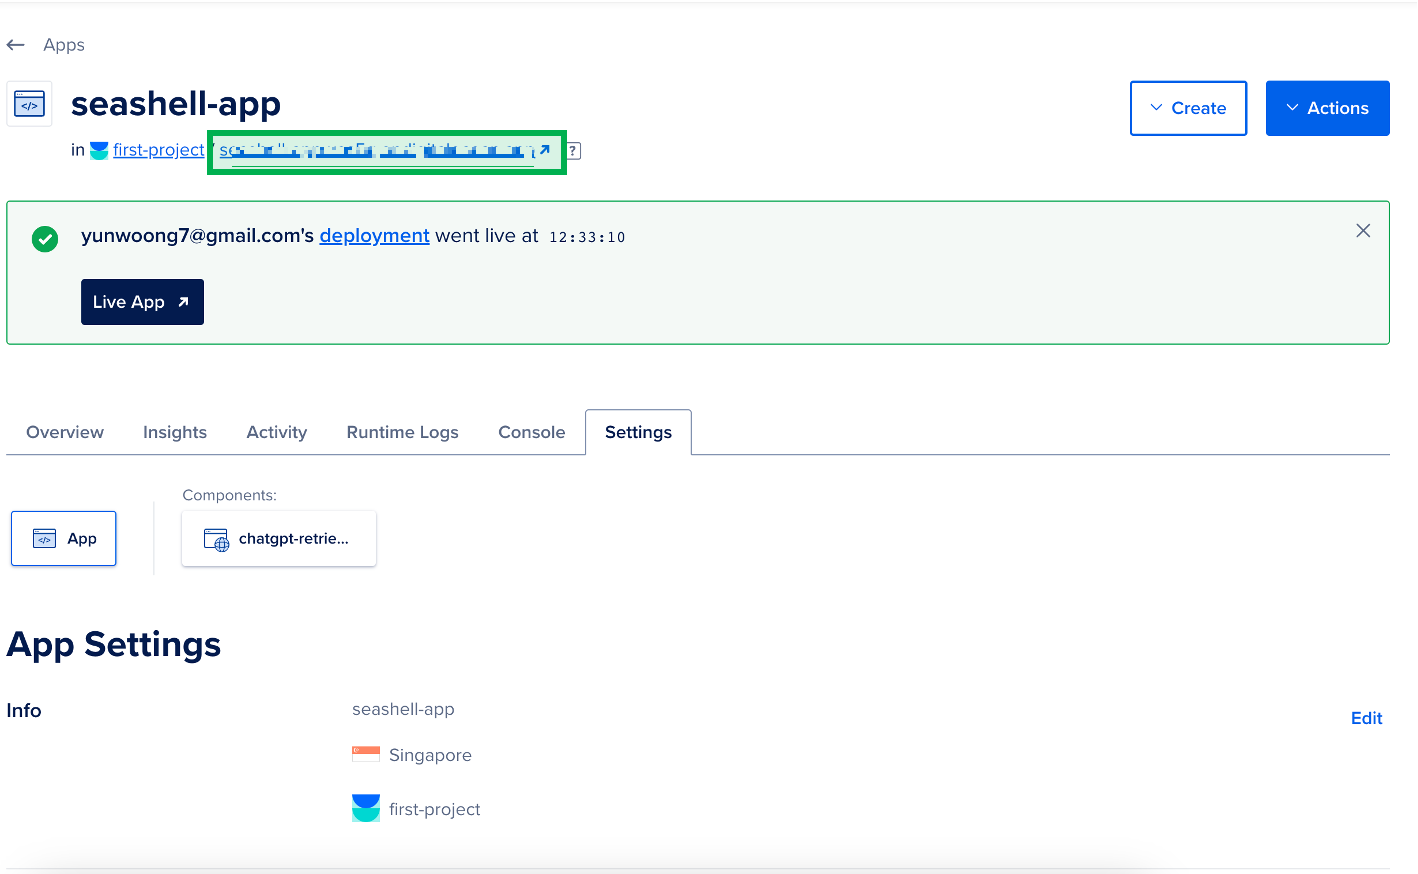
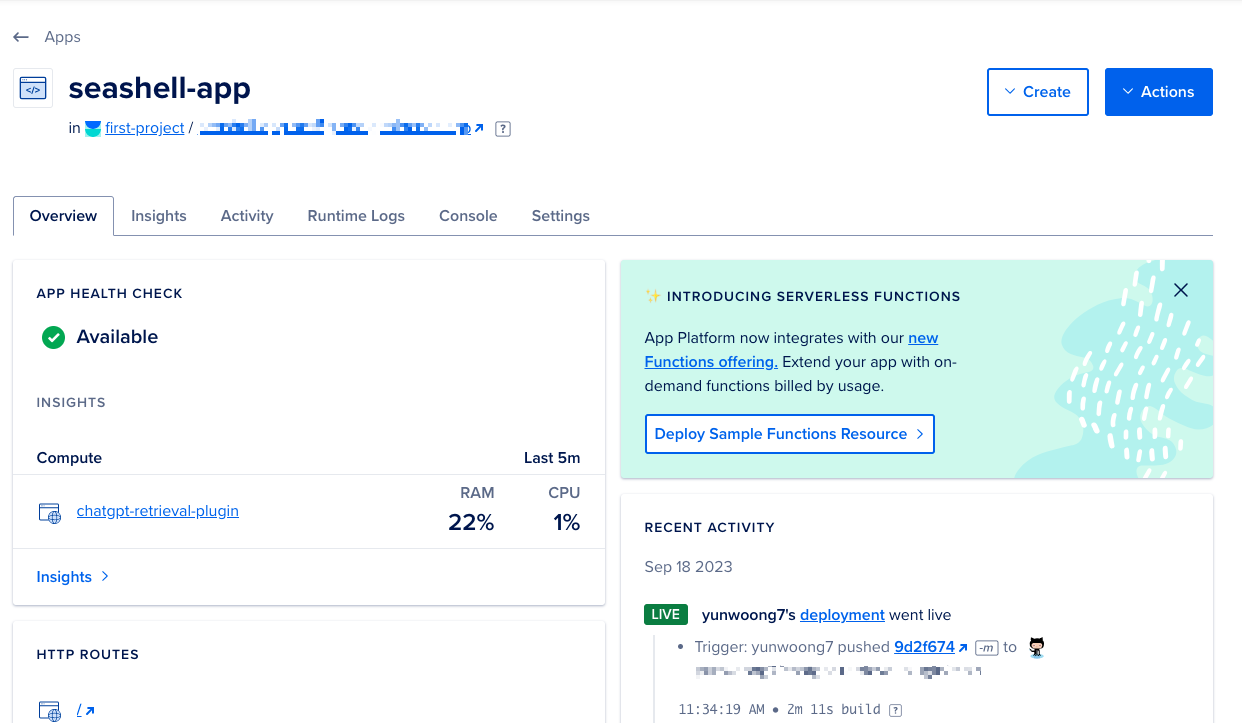
앱이 성공적으로 배포되면, DigitalOcean 대시보드에서 앱의 상태, 로그, 설정 등을 확인하고 관리할 수 있습니다. 위 배포한 App의 주소를 Plugin url에 사용해야 합니다.
#4. Plugin 설정 파일 수정하기
1) ai-plugin.json 수정
ai-plugin.json 파일에서 주요 항목들을 수정해야 합니다. 파일의 경로는 .well-known 폴더 하위에 있습니다.
{ "schema_version": "v1", "name_for_model": "retrieval", "name_for_human": "Retrieval Plugin", "description_for_model": "Plugin for searching through the user's documents (such as files, emails, and more) to find answers to questions and retrieve relevant information. Use it whenever a user asks something that might be found in their personal information.", "description_for_human": "Search through your documents.", "auth": { "type": "user_http", "authorization_type": "bearer" }, "api": { "type": "openapi", "url": "https://your-app-url.com/.well-known/openapi.yaml", "has_user_authentication": false }, "logo_url": "https://your-app-url.com/.well-known/logo.png", "contact_email": "hello@contact.com", "legal_info_url": "http://example.com/legal-info" }
- schema_version: 이는 설정 파일의 스키마 버전을 나타냅니다. 일반적으로 이 값을 직접 변경할 필요는 없습니다.
- name_for_model: 모델이 이 Plugin을 호출할 때 사용하는 이름입니다. 예시에서는 "Javis_Retrieval_DB"로 설정되어 있습니다. 원하는 이름으로 변경할 수 있습니다.
- name_for_human: 사용자에게 표시되는 Plugin의 이름입니다. "Javis Plugin"과 같이 원하는 이름으로 변경할 수 있습니다.
- description_for_model: 모델에 대한 Plugin의 설명입니다. 이 설명은 모델이 Plugin을 어떻게 사용해야 하는지를 알려주는 가이드 역할을 합니다.
- description_for_human: 사용자에게 표시되는 Plugin의 설명입니다. "Use it when utilizing the Jarvis plugin."과 같이 원하는 설명으로 변경할 수 있습니다.
- auth: Plugin의 인증 방식에 관한 설정입니다.
- type: 인증 방식의 유형입니다. "user_http"은 HTTP를 통한 사용자 인증을 의미합니다.
- authorization_type: 인증 토큰의 유형입니다. "bearer"는 Bearer 토큰을 사용한다는 것을 의미합니다.
- api: Plugin의 API 설정입니다.
- type: API의 유형입니다. "openapi"는 OpenAPI 스펙을 사용한다는 것을 의미합니다.
- url: OpenAPI 스펙의 URL입니다. 여기서는 DigitalOcean App Platform에 배포된 앱의 URL을 사용하였습니다. 필요에 따라 해당 URL을 변경할 수 있습니다.
- has_user_authentication: 사용자 인증이 필요한지 여부를 나타냅니다. false로 설정되어 있으면 사용자 인증이 필요 없다는 것을 의미합니다.
- logo_url: Plugin의 로고 이미지 URL입니다. 원하는 로고 이미지의 URL로 변경할 수 있습니다.
- contact_email: Plugin에 관한 문의나 지원을 위한 연락처 이메일 주소입니다. 실제 연락 가능한 이메일 주소로 변경해야 합니다.
- legal_info_url: Plugin의 법적 정보나 이용 약관에 대한 웹페이지 URL입니다. 필요한 경우 해당 URL을 제공하거나 변경할 수 있습니다.
url과 logo_url은 DigitalOcean에서 배포한 App의 주소로 url을 변경합니다. 원하는 로고 이미지의 URL로 logo_url을 변경합니다.
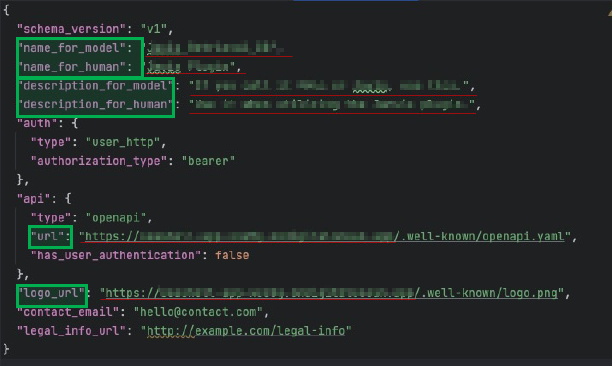
name_for_model과 name_for_human: Plugin의 모델 및 사용자용 이름을 적절하게 수정합니다. description_for_model과 description_for_human에도 Plugin에 대한 설명을 업데이트합니다. 특히, description_for_model은 ChatGPT가 Plugin을 올바르게 작동시키기 위한 중요한 정보를 포함해야 합니다. 이 설명은 ChatGPT가 어떻게 Plugin을 사용해야 하는지에 대한 가이드 역할을 하므로, 상세하고 명확하게 작성하는 것이 중요합니다.
2) openapi.yaml 수정
Open API 문서입니다. 이 문서는 API의 엔드포인트, 요청 및 응답 형식, 사용 가능한 스키마 등에 대한 정보를 제공합니다. openapi.yaml 파일에서 주요 항목들을 수정해야 합니다. 파일의 경로는 .well-known 폴더 하위에 있습니다.
openapi: 3.0.2 info: title: Retrieval Plugin API description: A retrieval API for querying and filtering documents based on natural language queries and metadata version: 1.0.0 servers: - url: https://your-app-url.com paths: /query: post: summary: Query description: Accepts search query objects array each with query and optional filter. Break down complex questions into sub-questions. Refine results by criteria, e.g. time / source, don't do this often. Split queries if ResponseTooLargeError occurs. operationId: query_query_post requestBody: content: application/json: schema: $ref: "#/components/schemas/QueryRequest" required: true responses: "200": description: Successful Response content: application/json: schema: $ref: "#/components/schemas/QueryResponse" "422": description: Validation Error content: application/json: schema: $ref: "#/components/schemas/HTTPValidationError" security: - HTTPBearer: [] components: schemas: DocumentChunkMetadata: title: DocumentChunkMetadata type: object properties: source: $ref: "#/components/schemas/Source" source_id: title: Source Id type: string url: title: Url type: string created_at: title: Created At type: string author: title: Author type: string document_id: title: Document Id type: string DocumentChunkWithScore: title: DocumentChunkWithScore required: - text - metadata - score type: object properties: id: title: Id type: string text: title: Text type: string metadata: $ref: "#/components/schemas/DocumentChunkMetadata" embedding: title: Embedding type: array items: type: number score: title: Score type: number DocumentMetadataFilter: title: DocumentMetadataFilter type: object properties: document_id: title: Document Id type: string source: $ref: "#/components/schemas/Source" source_id: title: Source Id type: string author: title: Author type: string start_date: title: Start Date type: string end_date: title: End Date type: string HTTPValidationError: title: HTTPValidationError type: object properties: detail: title: Detail type: array items: $ref: "#/components/schemas/ValidationError" Query: title: Query required: - query type: object properties: query: title: Query type: string filter: $ref: "#/components/schemas/DocumentMetadataFilter" top_k: title: Top K type: integer default: 3 QueryRequest: title: QueryRequest required: - queries type: object properties: queries: title: Queries type: array items: $ref: "#/components/schemas/Query" QueryResponse: title: QueryResponse required: - results type: object properties: results: title: Results type: array items: $ref: "#/components/schemas/QueryResult" QueryResult: title: QueryResult required: - query - results type: object properties: query: title: Query type: string results: title: Results type: array items: $ref: "#/components/schemas/DocumentChunkWithScore" Source: title: Source enum: - email - file - chat type: string description: An enumeration. ValidationError: title: ValidationError required: - loc - msg - type type: object properties: loc: title: Location type: array items: anyOf: - type: string - type: integer msg: title: Message type: string type: title: Error Type type: string securitySchemes: HTTPBearer: type: http scheme: bearer
info 영역에서 title, description, servers의 url 값을 변경합니다. title과 description은 적당한 설명과 제목을 입력하면 되고 servers의 url은 DigitalOcean에서 배포한 App의 주소로 변경합니다.
3) Git Commit과 Push
변경한 내용을 반영하기 위해 Git Commit 및 Push를 수행하여 저장소에 반영합니다. DigitalOcean에 설정 당시 Auto Deploy를 체크했다면 Push가 완료되면 자동으로 배포가 진행됩니다.
지금까지 DigitalOcean을 활용하여 ChatGPT Retrieval Plugin을 클라우드에 배포하는 과정을 함께 살펴보았습니다. 클라우드 배포는 Plugin을 안정적으로 운영하고, 더 많은 사용자에게 서비스를 제공하는 데 중요한 단계입니다.
다음 글에서는 이렇게 배포한 Plugin을 ChatGPT에 설치하고 활용하는 방법에 대해 자세히 알아보겠습니다. Plugin의 실제 활용 방법을 통해 어떻게 ChatGPT의 기능을 확장할 수 있는지 설명하도록 하겠습니다.
ChatGPT Retrieval Plugin 개발 (4) : ChatGPT에 개발한 Plugin 추가하기
이전 글에서는 ChatGPT Retrieval Plugin을 클라우드에 배포하는 과정을 함께 살펴보았습니다. 이번 글에서는 그 다음 단계인, ChatGPT에 개발한 Plugin을 어떻게 추가하고 활용하는지에 대해 알아보겠습
yunwoong.tistory.com
'Tech & Development > AI' 카테고리의 다른 글
| 나만의 ChatGPT Plugin 만들기: TODO List (No Auth) (0) | 2023.09.24 |
|---|---|
| ChatGPT Retrieval Plugin 개발 (4) : ChatGPT에 개발한 Plugin 추가하기 (0) | 2023.09.23 |
| ChatGPT Retrieval Plugin 개발 (2) : 배포 및 실용 가이드 (0) | 2023.08.28 |
| Pinecone을 이용한 벡터 데이터베이스 시작하기 (0) | 2023.08.28 |
| ChatGPT Retrieval Plugin 개발 (1) : 아키텍처와 사전 준비 (0) | 2023.08.26 |
댓글을 사용할 수 없습니다.